And just in time for the snow, too! This post is being written by me, and "me" being Andrew, just so you stand forewarned...
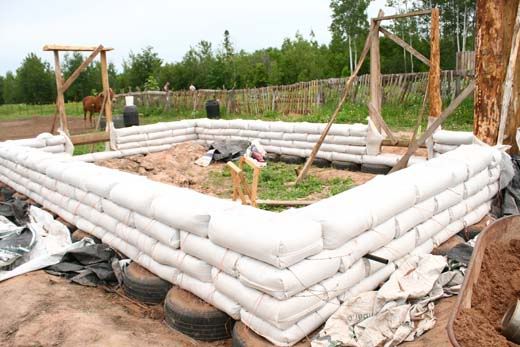
This was our summer project.. A 16x25 cobwood barn. We plan on putting a small rocket-stove greenhouse in front. The warm attached greenhouse, plus the critters' body heat will hopefully keep the barn at a comfortable temperature for chickens, goats and an occasional calf or sick animal. The goal was to build the structure with the leftover cordwood from our house for as dirt cheap as possible. So far we haven't spent more than $500-$600 on it. We also experimented with a few new ideas along the way, using the barn as kind of a test project for load-bearing cobwood walls and a shallow sandbag foundation.

We excavated the site by hand and dug a trench, about a foot or two deep and a couple feet wide for gravel and drain tile. You can see the first course of gravel-packed tires under the sandbags. The bags could have gone right on the ground, but the tires offer a wider footing and I basically wanted to try packing a few of them earthship-style. It's a lot of work, and I wouldn't do it again unless I was building a foundation with nothing and had no bags available.
We wrapped the sandbag foundation with plastic erosion control netting and plastered with a cement/lime/sand mix. We were too cheap to use chicken wire or stucco lath, but the netting was a bad idea for this application.. Too flimsy and too dense to let the plaster key in; perhaps a heavier plastic fence/netting would make a better cheap alternative.
The cob mix was clay, sand, dried and shredded horse manure, chopped straw and some dairy products to improve stickiness and workability.
For anyone who's unfamiliar with cordwood building; you build with
firewood sized pieces of logs (16" usually), you leave a cavity in the
center that is filled with sawdust/lime or some other kind of insulation
to prevent the cold or heat to wick right through the wall. Cordwood is
typically done with cement, but we've chosen to build both
our house
and this barn using cob as our mortar for the sake of keeping this more
natural and breathable (not to mention cheap!) We've not been
disappointed! Cob is amazing!! :)
The rafters are Aspen logs cut off our land.
The logs were bolted to 2x4 scabs, which were in turn screwed to a couple rounds of cordwood. This helps to both spread the weight of the roof out on the wall, as well as tie down the rafters.
Stackwall corners were something new and kind of fun.
The mix tuck-pointed well, in spite of the chopped straw..
Slabwood headers over openings..
Laying down pallet sheathing over the log rafters.
Pros: Free.
Cons: A big pain to get the roof somewhat level and safe to walk on. Hardwood pallets are heavy and defiantly bend each and every nail you try to stick through them.
Pros: Free....
Also, you will notice that the front of the building is sandbags with an earthen plaster all the way up. This is to provide more thermal mass in the south-facing greenhouse back wall, as well as give us more experience with earth/sandbag building.
Finally got the pallets up and the slab fascia installed.
Over the pallets, we put down a layer of old carpeting, then a pvc billboard tarp for a waterproof membrane. Another layer of carpet over the plastic for extra protection, and finally a layer of hay bales for an insti-green roof. I imagine we'll seed it in spring..
Here's how it looked this afternoon:
Still need to put some windows and doors on..
I found this project exciting because of how cheap it was, and it wouldn't take too much more work to turn it into a warm and cozy cottage! The roof was practically free, minus the billboard and some nails.
Anyway, just thought I'd share. Cheers!


